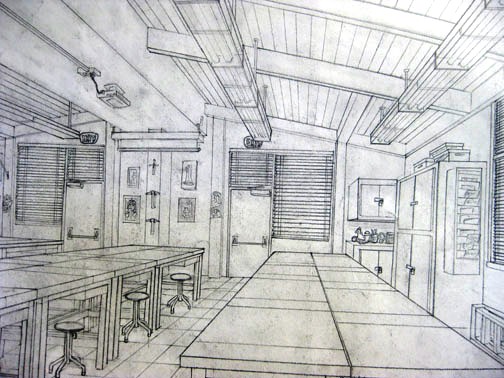
Two Point Perspective

Two-point perspective is a type of linear perspective. All categories of linear perspective include a horizon line and a stationary point (the position of the observer). In two-point perspective, there exist two points from which an object’s lines radiate from; the sides of the object vanish to one of two vanishing points on the horizon line. An object’s vertical lines always are at a 90 degree angle to the horizon line. By changing the vanishing points of the object, one can make increase or decrease the size of the object.

Two point perspective is similar to one point which we covered in the previous post. The biggest difference is that we now have two vanishing points. In one point perspective we would see the box from the front. In two point we have turned the box in space and we now see the corner and so the sides of the box will now have two points to create the space.When creating a two point perspective drawing it starts like one point drawing, the first thing you should establish is your horizon line. Remember this is where your eye level is. Next you would decide where your vanishing points are, this is where the angles of objects recede into space. When making up a space keep in mind to place them as far apart as possible. If you place the vanishing points to close they will distort the objects in a way that will make them look unnatural. Then begin placing corners of objects, buildings, people. Pay attention to size and where they are to the horizon line (your eye level) are they above, below, intersecting, both? Follow the corners of each object to the appropriate vanishing point and you will have a two point drawing.

Notice how the third example looks a little strange...thats because the vanishing points are too close together
   
Take note that the top of the cylinder is closer to the horizon line,
so the ellipse is different from the bottom one. Use the vanishing points to
keep it in perspective. Drawing out a simple box will aid you in creating
more difficult shapes.
TERMS USED IN PERSPECTIVEHorizontal Line.—A line on a level with the observer's eye, not always apparent. Visible in a view of the sea or the open flat country.Point of Sight.—A point on the horizontal line opposite the observer's eye. In parallel perspective this is also the vanishing point. It is sometimes called the centre of vision, or the centre of the picture. Distance.—The line marked in the drawing as running from the point of sight to the station point, or observer's eye, and measuring the principal distance. It will here be spoken of as the distance or the line of distance. This line is at right angles to the horizontal line and equal in length to the base-line or the width of the picture. When shorter, that is, bringing the observer's eye closer, the result will be a rendering of the objects in sharp-angled or violent perspective. This line is called by some the vertical line, probably because it is a vertical line in the drawing. But this term seems misleading, as the line represents in actuality an imaginary level one; i. e., the line of vision from the observer's eye to the centre of vision or the point of sight. Station Point.—The position of the observer's eye opposite the point of sight, and at a distance from it equal to the width of the picture. This position of the station point makes the optic angle for viewing things a proper one; that is within sixty degrees. It will help in working out problems in perspective to think of the station point and the line of distance as not on the flat surface of the paper but jutting out toward you. The station point is only placed on the paper to use in establishing the positions of vanishing and measuring points. If there is no room below on the drawing-board, the station point can be placed above the horizontal line. Base-Line.—A line parallel to the horizontal line and below it at a distance equal to the height of the observer's eye. The base of the picture plane and the front line of the ground-plan meet at the baseline. In working to scale, measurements are marked on the base-line. It is sometimes called the ground line. Picture Plane.—An imaginary plane resting on the base-line. The horizontal line crosses it at the height of the observer's eye. The line distance meets it at the point of sight at right angles. The picture plane can be likened to a transparent screen to which the points of the view are brought forward by lines that centre, or focus, at the eye. In passing through this screen these lines leave their impress and produce a huge picture of the view. Vanishing Point.—A point to which converge—in a perspective drawing—lines which in nature are parallel to one another. For level lines the vanishing points will be found somewhere on the (level) horizontal line. Inclined lines have their vanishing points either above or below the horizontal line. Second Vanishing Point.—If the first vanishing point is known, the second can be found by drawing a line from the first vanishing point to the station point and from here, at a right angle, another line continued to the horizontal line. Where this line cuts the horizontal line marks the position of the second vanishing point. Note and remember : in picturing right-angled objects, the two lines joining the vanishing points by meeting at the station point always meet at a right angle. Measuring Point.—A point on the horizontal line to which a line is drawn from a measurement or a scale on the base-line. This line is called the measuring line. A measuring point is obtained by centering the compasses at a vanishing point and drawing an arc from the station point to, and cutting, the horizontal line. The measuring point so obtained is used for determining or fixing lengths on lines going to its particular vanishing-point. In parallel perspective the measuring point and the station point are equidistant from the point of sight. Measuring Line.—A line to the measuring point from a measurement on the base-line. Where it cuts its respective vanishing line it will determine, perspectively, the measurement. Vanishing Lines.—Parallel lines that, in a perspective projection, recede and converge to a vanishing-point. Scales and Measurements are marked on the baseline. if Vertical Scale can be erected on the base-line. Of the two kinds of linear perspective, parallel, generally speaking, is the less complicated. Anything can be presented according to its rules, although it is not always the most practical way of working. But the method is easily explained. ADDITIONAL MATTERS ABOUT PERSPECTIVE A direct front view of a circle assumes no change in form and can be described with the compasses. But when it takes some other position with reference to the eye, it has an outline that cannot be constructed with the ordinary drawing instrument. In this case the outline is an ellipse. The way to get this elliptical outline is to use a modification of the method of copying by squares. The circle is enclosed by a square, which is divided, checkerboard fashion into a number of smaller squares. Then a square is put in perspective and filled in with the same number of smaller squares. Now the curving line can be copied by noting the points where it cuts the lines that define the small squares.  A similar method is applicable for curves of window openings and doorways. Enclose the plan of the curve in a right-angled form— square or oblong, whichever kind it suits. Put a like form in perspective within which draw whatever diagonals, verticals, and vanishing lines will help in fixing points that make the copying of the curve easy. Then rule the enclosing right-angled form with corresponding lines and copy the curve as you would in copying by squares. It is a simple matter to find the centers of rectangles or squares in perspective by drawing the diagonals. This is the way to find the middle of an end wall of a building so as to draw a vertical line to the ridge of the roof. The slanting lines, defining the ends of an ordinary ridge roof, could be drawn to vanishing points. But in most cases these points are beyond the limits of the drawing-board, so that it is necessary to draw them in some other way. This can be done by first putting a box in perspective, of the proper size, and then with diagonals and centre lines finding the points to which the slanting lines are drawn.  Anything pyramidal in form should be enclosed, to render it in perspective, within a skeletonized box of lightly drawn lines. The centerline is an instrument used in drawing vanishing lines when the drawing-board is too small for the vanishing point. It consists of a ruler, to one end of which two arms are fastened by an adjustable bolt and nut. Two nails are driven into the board, one below and one above the horizontal line. The three parts of the centerline are so set that they are like the letter Y—the ruler the stem and the arms like the upper parts of the letter. When using, the inside edges of the arms are run against the two nails and radiating lines procured in moving the instrument along. The angles at which the arms are set to each other, and to the ruler, and the places and distances apart of the nails in the board determine the degree of divergence of the vanishing lines. |


This Page has some additional information that is helpful and really good. http://www.utdallas.edu/~melacy/pages/ill_space.html


.JPG)

.JPG)


