ONE POINT PERSPECTIVE

This post will cover the basics of one point perspective…
What is perspective, actually?
”the theory or art of suggesting three dimensions on a two-dimensional surface, in order to recreate the appearance and spatial relationships that objects or a scene in recession present to the eye or the appearance of objects, buildings, etc., relative to each other, as determined by their distance from the viewer, or the effects of this distance on their appearance”
One point perspective is the least involved of the types of perspective. Again, perspective is a technique used to show depth and space on a picture plane. Linear perspective is the process of using rendering and lines to create the illusion of depth on the picture plane.
There are 3 main kinds of perspective…
One point perspective
Two point perspective and
Three point perspective.

Horizon Line


The horizon is the line that we see where the earth/sea meets the sky....even if it is not visible in your drawings.. there is a horizon line. This line can be place high or low on the paper, it will tell the viewer their vantage point in space. In the example below you can see how changing the orientation of the horizon line effects the viewpoint.

Tip: use the ruler’s edge perpendicular to the papers’ edge to get a straight line, in fact make sure you use a ruler for most if not all of your drawing too.
Vanishing Point

Make a vanishing point…
The vanishing point is the the point where your buildings, rails, roads seem to converge into one single fixed position along the horizon.
Placing Objects

Draw out the shape of the object, in this example a simple square, paying close attention to correct sizing and proportions.
Connect an imaginary line called the "orthogonal" to the vanishing point and the sides of the block there’ll be four in total but three visible in this case.. Draw horizontal lines where you want your block to end [parallel to the horizon]
and vertical line where you want the side of the block to end [perpendicular to the horizon]
and vertical line where you want the side of the block to end [perpendicular to the horizon]

Now you’re pretty much done there! just erase the orthogonal lines and you should have a 3d looking block in perspective.
Now continue to build more shapes. Make sure to follow the same principles for each object.


Tips:
Draw the orthogonal lines lightly so that you can erase them easily.
Add details to your drawings, like windows, sills, telephone poles and people.. just follow the orthogonal to decide the height or width of the object/person/creature in space.
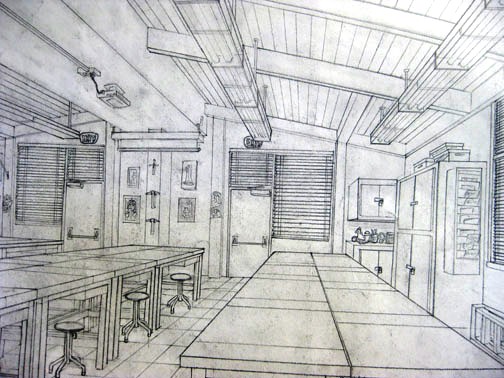
Here are some examples that can help you to get started


Cool Movie shots of one point perspective
http://www.youtube.com/watch?v=flq0t4jrqJQ
No comments:
Post a Comment
Note: Only a member of this blog may post a comment.